Can I Lube Hose Spicket for Easy on Off
Using her master's in sustainable development, Susette helps Southern California water agencies carry out their water conservation projects.

If you have a leaking water spigot, it might be easier to just replace it rather than try to fix it.
Outdoor faucets (also known as water spigots or hose bibbs) are subject to a lot of wear and tear that cause them to leak over time. However, they can be easier to fix than you might think. If you are the do-it-yourself type who welcomes challenges around the house, this is the article for you.
Before You Start, See if You Can Fix the Spigot
You've probably noticed that your spigot is leaking, but does it just require a minor repair, like replacing a washer, or do you need a completely new one?
Examine it for any visible signs of damage to the handle, stem, or supply pipe. Is it leaking from the handle, spout, or where it joins the main supply pipe?
- If it's leaking from the handle, try tightening the packing nut or replacing the washer(s) first (see the photo below).
- If it's leaking from the joint to the supply pipe, remove the spigot, inspect the threads for damage, clean the threads, and wrap them with Teflon tape.
- If it's leaking from the spout, the inner mechanism may be damaged, and it's probably easier and cheaper to just replace the entire thing.
Hose bibbs usually cost anywhere from $5–10, but a plumber may charge you upwards of $150 for the replacement service. Save some money and do it yourself. As you'll see, they're really quite simple to replace.
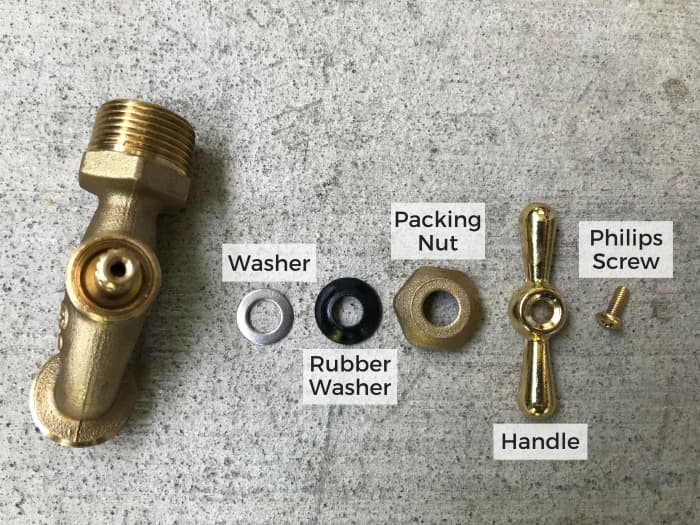
Hose bibb handle parts unpacked and labeled
To make the job easy and avoid frustration, gather all your tools and supplies first.
- Replacement spigot
- Two pipe wrenches
- Spray lubricant (penetrating oil)—to help loosen the threads
- Stiff-bristled brush—to remove corrosion and other debris
- Old rags—to wipe your hands and the pipe after scrubbing
- Teflon tape (plumber's tape)—to seal the threads and prevent future leaks
What Type of Spigot Should I Get?
I recommend removing the old spigot and taking it to the hardware store to find a direct replacement. There are two things you or the store clerk should be looking for:
- Thread size: They usually come in 1/2-inch or 3/4-inch. Make sure you get a replacement that's the same size.
- Male or female: Is your spigot male (the threads are on the outside) or female (the threads are on the inside)?
How to Replace an Outdoor Water Spigot
- Locate the water shut-off valve.
- Shut off the water supply by turning the water shut-off valve clockwise.
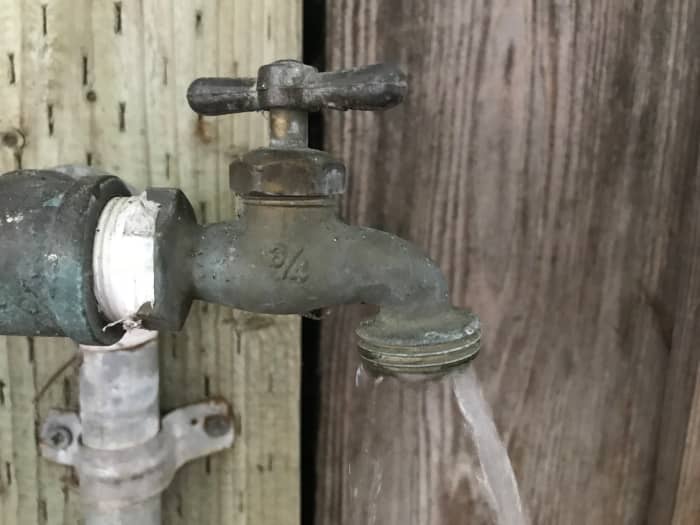
- Open the spigot to drain the remaining water.
- Remove the spigot by firmly grasping both the spigot and the supplying pipe and twisting the spigot counterclockwise.
- Brush the threads to clean the corrosion.
- Seal the threads with Teflon tape.
- Install the new spigot by hand before tightening it with a wrench.
- Check for leaks.
Each of these steps is explained in detail in the sections that follow, and photos are provided to help guide you through the process.
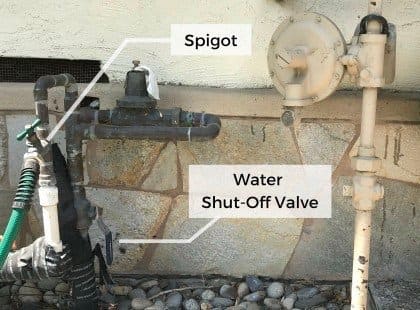
Outdoor faucets often have their own shutoff valves, which can be located near the spigot or inside the house on the wall where the faucet is. If yours doesn't, you'll have to look for the main shutoff valve.
1. Locate the Main Water Shutoff Valve
In most houses, the main water shutoff valve is located near the water meter. If you live in a cold region, the meter is likely in your house or garage. If you live in warmer climates, the meter is probably outside on the front or side of your house.
Scroll to Continue
Read More From Dengarden
You may have one or two valves. The valves will either be controlled by a lever or a wheel handle. Ball valves use levers, while gate (or globe) valves use wheel handles.
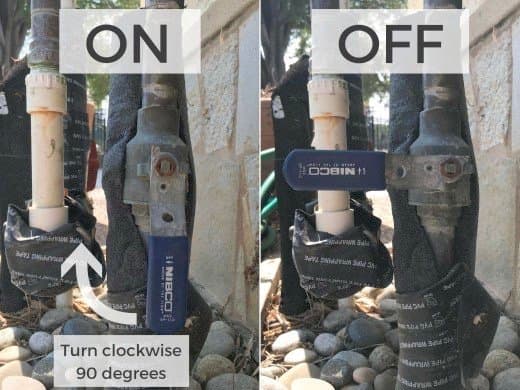
Turn the lever or wheel handle clockwise to shut off the water.
2. Shut Off the Water Supply
If you're unsure which shutoff valve will cut supply to the faucet you're trying to replace, turn the faucet on slightly, locate a shutoff valve, and close it. The water should stop running within a minute or two. If it doesn't, go back to the meter and look for another shutoff valve.
A house with a large property can have up to three main shutoff valves––one from the street that shuts off all water on the property, one to the irrigation system alone, and another that controls the house water supply.
Shutoff valves with levers usually turn only 90 degrees. Wheel handles turn until they are seated (usually within one or two full revolutions).
Drain leftover water to avoid making a mess.
3. Drain the Excess Water
Open the spigot to let any remaining water drain out. You may have stopped the water flow, but there is likely still some water in the portion of the pipe from the shutoff valve to the spigot. Remember to close it again when you're done.
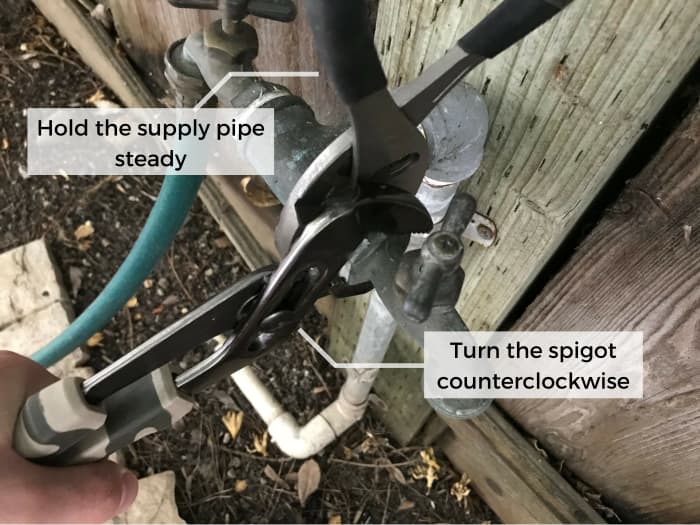
Make sure the supply pipe is secured to prevent any damage from the twisting force.
4. Remove the Old Spigot
Firmly grasp the supply pipe at the hex nut with one pipe wrench. Keeping the supply pipe steady to avoid damaging the entire system, turn the spigot counterclockwise with the second pipe wrench.
Tip: If it doesn't turn, stop. Don't force anything, as this can cause additional damage. Spray some lubricant in and around the joint and leave it on for a few minutes to loosen the threads.
A few quick taps can also help loosen up the corrosion. Just remember to stabilize the supply pipe before doing so.
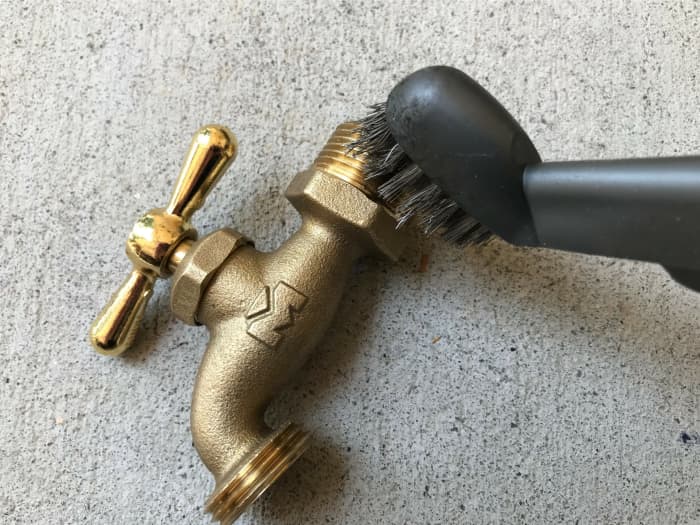
Use a brass or nylon brush rather than a steel brush to avoid scoring and damaging the threads.
5. Brush the Threads to Clean the Corrosion
Use a stiff-bristled brush to remove corrosion, left-over plumber's tape, and other debris. This prevents damage when installing the new spigot and ensures a water-tight seal.
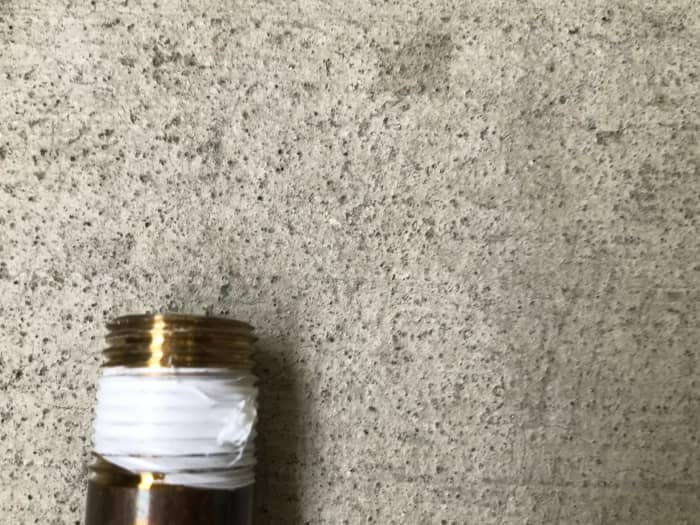
Start from the base and overlap by 1/2–3/4 the width of the tape.
6. Seal the Threads With Teflon Tape
Wrap the exposed threads with Teflon tape, starting at the base and overlapping about half the width of the tape until you reach the tip. Teflon tape fills in the tiny gaps between the threads to ensure that no water can leak out.

Hand-tighten first to make sure you don't accidentally cross the threads.
7. Install the New Spigot
Carefully screw on the new spigot by hand until it is seated. Tighten it the rest of the way using a pipe wrench. To prevent damage to the protective finish, wrap a towel around the spigot before grasping it with the wrench.
8. Check for Leaks
Once it's installed, check for any leaks from the joint, stem, and spout. Make sure the spigot is turned off before turning the water supply back on. Then, open the spigot and make sure that water is only coming out of the spout.
Video: How to Replace a Leaky Spigot Outside
Common Questions About Water Spigots
In this section, we'll go over some of the most frequently asked questions about outdoor faucets.
What's the Difference Between a Tap, a Faucet, a Spigot, and a Hose Bib?
All of them can refer to a valve that controls the flow of water, but there are some differences in their usage. For example, a tap in British English refers to the water control valve in sinks and bathtubs—what would be considered a faucet in American English.
Spigot is a more technical term for a tap or faucet used by plumbers and other people in the industry, and it usually refers to outdoor faucets. Hose bibb (or hose bib) is another term for a spigot and is so named because it is where you would normally attach a hose.
How Does a Spigot Work?
In a regular spigot, water supply is controlled by a valve—either a ball, globe, or gate valve—that can be opened or closed by a screw-down mechanism. The diagram below depicts a gate valve. As you turn the handle, the mechanism either opens or closes the valve.
Leaks from the spout generally occur due to wear and tear in this inner mechanism. You may choose to replace the individual components, but it is usually cheaper and easier to just replace the entire spigot.
How Can I Prevent an Outdoor Faucet From Freezing?
If you live in a region that is prone to frost, leaks can be caused by water expansion inside the pipe and/or spigot. To prevent frost damage, follow these steps:
- Close the main water shutoff valve and drain the water from the spigot(s).
- Wrap the spigot and any exposed pipes with pipe insulation (usually cylindrical foam pieces). Duct tape them for a tight and secure seal.
- Install a frost-proof faucet.
Note that wrapping with insulation only slows heat loss. It does not prevent it, nor does it generate heat. With continuous exposure to freezing temperatures, the insulation will become ineffective. This is why draining the water out or installing a frost-proof faucet are the best ways to prevent frost damage.
How Does a Frost-Proof Faucet or Spigot Work?
The basic mechanism of a frost-proof or freeze-proof faucet is similar to a regular faucet; a valve is opened or closed to control the flow of water. The difference is where the valve is located.
In a frost-proof spigot, the stem (the portion that houses the valve control mechanism) extends up to two feet into the house. This prevents the water from being exposed to freezing temperatures since the valve (the point where the water supply stops) is now located in the house.
This content is accurate and true to the best of the author's knowledge and is not meant to substitute for formal and individualized advice from a qualified professional.
Questions & Answers
Question: What do you do when the supply pipe is not accessible to hold while removing the faucet?
Answer: How far away is it? If it's just inside the wall in a hole that's too narrow to fit your hand in, you could probably use a long-handled pipe wrench. Otherwise, try using a faucet handle puller. They don't cost much—just $15 or so on Amazon.—and they give you extra reach.
https://smile.amazon.com/Plumbers-Deluxe-Faucet-Ha...
Question: My outside faucet has an anti-siphon thing at the top which is where I have my leak? How do I fix that? And my spigot is welded to a pipe (maybe 6"). I was able to unscrew that pipe.
Answer: That's a good question. The anti-siphon part is there to stop water from the hose backing up into your house water supply. If it's leaking, there's a good chance of some dirt or little rocks clogging it up and stopping the little piston inside from moving up and down. It's an easy fix, so that's the first thing I would try. Here's a video that will show you how:
https://www.youtube.com/watch?v=M9NQFo4-OeU
Question: What do you do when the supply pipe is in the wall and no way to hold it in place to stabilize/steady it when removing the faucet? ie. the faucet is right against the brick wall.
Answer: Something or somebody had to be holding that pipe, while the faucet was screwed on initially. That means there's probably access inside the house (basement?) to the other side of the pipe. I would recruit an assistant to push the pipe forward from the inside, so you can insert a pipe wrench on the outside, as soon as there's room.
Question: How do I replace an outside water spigot, if I have a PVC pipe for the feed?
Answer: It depends on why you're replacing it. Start by acquiring a combination PVC/metal fitting and some CPVC glue. Then turn off the house water. If the spigot is the problem, you'll take off the old one, clean the PVC pipe, screw the new spigot onto the fitting, then glue the fitting onto the PVC pipe. If the problem is a break in the PVC pipe, but the spigot is ok, you'll have to saw off the broken pipe, clean out the pipe left in the wall, screw the old spigot onto the new fitting, and glue the new fitting onto the PVC pipe. Here is a video that shows how to install a new fitting and spigot onto the PVC pipe.
https://www.youtube.com/watch?v=WctT8AGsaBs
Question: How do I replace an outside water spigot if I have copper pipes?
Answer: It depends on if the copper pipe is threaded or not. If it is (I'm assuming you're replacing the faucet), you will replace the old faucet with a new one in the same way you would with any other kind of pipe.
If it isn't threaded, and the leak is where the pipe joins the faucet, you'd have to cut off the end that inserts into the faucet, and use either solder or a compression fitting to put a new end on.
https://www.youtube.com/watch?v=t7T-MtE3FL0
Here's how to solder it on:
https://www.youtube.com/watch?v=K-BlJBJIUdQ
If you use a compression fitting, watch out that you don't tighten it too much:
https://www.youtube.com/watch?v=KR9cQwnnHXw
If you're connecting copper pipes to plastic, you'll want to insert a liner in the plastic pipe to keep it strong and not leak under the compression fitting:
https://www.youtube.com/watch?v=aUeyjugrdDM
Question: What to do when the outside faucet is on and water leaks into basement?
Answer: You'll need to trace the leak from the basement back to the source. It could be that the faucet will have to be replaced, or it could be that the pipe has frozen at some point and cracked inside the wall, which is a much bigger job. There are different ways to test it. The following forum is an excellent resource, with the questioner asking the same question you are—maybe with a different outcome, but it will help you understand some of the possibilities. https://www.doityourself.com/forum/plumbing-piping...
Question: The spigot broke off from a brass pipe. How do I know that I can replace my new spigot to my old pipe?
Answer: The best thing to do is take a photo of the pipe and take it, along with the new spigot, to your local hardware store—not a chain store, if you can help it. Family hardware stores are usually run by people who really know what they're doing. They'll also need to know how big the pipe is, so before you take the photo you can clean up the old pipe, measure to see if it's a 1/2" or 3/4" opening (or other), and write the measurement on a little note you can hold next to the pipe. Then take a photo. Better yet, take the photo before buying a spigot, then buy whatever your local hardware store rep recommends.
Question: Should I add grease to replacement washers?
Answer: It depends on the type of water you have flowing through. If it leaves calcium deposits behind, making your faucet stiff to turn, then applying plumber's grease might be a good idea. Or if your faucet squeaks a lot, grease can help remove the squeaking. You're not applying the grease to the washer, though. You're applying it to the handle where it turns.
© 2012 Susette Horspool
Susette Horspool (author) from Pasadena CA on July 29, 2019:
Aah. Hoses come in different sizes. You might want to measure your faucet at the point where the water comes out. Most likely it will be either 1/2" or 3/4" across. Then you'll need to buy a hose that's the same size.
Dawn Miller on July 29, 2019:
I don't have a leaky faucet, but I need my faucet replaced (I think). The water hose does not fit on the faucet, so I can't use the water as needed. I don't know what happened to it, the water works. I bought a new hose, and it's not the hose.
Davana on September 11, 2018:
I just got ripped off by plumber who just replaced the head on a yard hydrant after arguing with him about having to dig up the stand pipe. I was informed that if it wasn't bent froze or otherwise damaged there was no need to dig up just to replace faucet head. Just unsrew and replace ! Of course, shut off water and becareful not to damage twist or turn stand pipe adjust water for valve and voila. I am 70 yr old woman and can't use a big wrench or would have done it myself . I ordered the 50.+ Part and asked a plumber to install... 735.00 dollars. I complained but to no avail! I am very upset to say the least. I even called manufacturer of the part and they said 1 in 100 times do ever have to dig up a stand pipe the sent instructions and everything 3 step process with pictures! Still argued but said he'd try it but he always dug them up. That would have cost 1200.00 dollars OMG!!! Am I nuts or what?
wathman on August 26, 2018:
I just repaired the hose bib in a house I just bought and it might be beneficial to add some insights for frost free hose bibs. Here is what I encountered. My first thought was to try to replace the whole assembly with something newer, but the threaded coupling for this type of hose bib is typically 8-12 inches deep into the wall. Figuring out how to uncouple the old one and thread on and seal a new one with next to no access from my basement was not happening. A plumber might be able to do it, but definitely not cheaply.
Equivalent new hardware was about $30 if I did have a way to install it as a DIY project.
What I ended up doing is disassemble the frost free hose bib and examined the stem assembly. Was generally in good shape, but the gasket and washer had some kind of oxidation caked on and were pretty stiff and compacted. Found a "Wall Hydrant Repair Kit" for $20 that had a new washer and a new handle that I also needed (about $8 for that part alone). After cleaning out the rest of the stem assembly and swapping in parts, the frost free outdoor hose bib that has probably been abused for the past 25 years is leak free again.
Susette Horspool (author) from Pasadena CA on September 04, 2017:
@Patricia - The price is going to vary depending on the difficulty of the project, i.e. how long it's likely to take for the repair. From what you say below it sounds like the plumber will have to break into the stucco to access the pipe inside the wall. He won't know where the leak is relative to the nearest join (where two pipes connect), so he'll need to be able to actually see the pipes to determine how much needs replacing. He'll also want to see if the pipe is breaking down because it's old, in which case there may be leaks in connected pipes too.
Breaking into the stucco, checking for leaks further in, repairing each one, then closing up the stucco afterwards makes the cost higher than the rough figure I gave below. Looking at it in terms of time, $900/$55 per hour = 16 hours for the one repair, assuming they charge what most plumbers do.
To verify whether the plumber's estimate is reasonable for your area, I would suggest you call your water supplier and tell them your situation. If they can't help you, ask who can. Or look for a local nonprofit like Rebuilding Together to see what they recommend.
https://rebuildingtogether.org
Patricia Ludwig-Longello on September 04, 2017:
I have a spigot that is slightly leaking not sure where Not far down the line but nevertheless- somewhere in the line close to the part that comes from the stucco- I had a company that came and gave me estatament from 900-1300 then told me they could go as low as 800 when I questioned price but no lower their reviews seem to be good except for that pricing i'm just trying to get an honest opinion about the price
Susette Horspool (author) from Pasadena CA on August 30, 2017:
That depends on what you mean by "cemented." If it's really cemented or glued, you'll probably have to replace the pipe behind it as well. In that case, don't even bother trying to pry it apart. Just unscrew the pipe behind it and take it off as one piece.
If what you mean is that it's seriously stuck, then you'll need two 12" wrenches to unscrew it as follows:
http://homeguides.sfgate.com/ways-stuck-faucet-off...
Angela on August 27, 2017:
If the old faucet appears to be cemented on to the pipe, how do you recommend getting it off?
Susette Horspool (author) from Pasadena CA on July 11, 2017:
@Nick - The cost depends on what's wrong, of course. In the U.S. the average replacement cost for the entire faucet will be around $250, if a plumber does it (includes labor). If there's a leak in the pipe behind the faucet, it will cost more to replace both. The minimum charge for a plumber is $55 per hour.
If you do it yourself and it's just the faucet, it should cost a little less than $100 for materials, plus the time you spend shopping and installing. If you live in a cold area, be sure to buy a frost free silcock (outdoor faucet). Good luck!
Nick Brown on July 10, 2017:
Great blog, extremely helpful.
One question, can you give me a berh rough guess on cost of materials needed to replace the spigot, replacing the entire spigot, faucet, and tap?
Parts cost $125, $200, $300...?
Just spent 40 minutes cutting up my hands trying to water my dead rose bushes. Time for action!
Thank you
Nick
Susette Horspool (author) from Pasadena CA on June 15, 2017:
@Carole - You mean the nut that holds the spigot onto the pipe? Did you spray a lubricant on it first? If so, and it was still too hard, can you get some help to screw it off with the pipe wrenches?
Carole Brinkert on June 14, 2017:
l am still one of many that cannot remove the screw in the handle...so the rest of the info. is moot!
Kristi Sharp from Born in Missouri. Raised in Minnesota. on June 28, 2012:
Very useful and well explained. It seems as though you've detailed everything step by step which is exactly what people need. Great use of videos. Nicely done. -K
Susette Horspool (author) from Pasadena CA on June 28, 2012:
Lindacee - We haven't even started talking about outdoor plumbing problems yet. Now think about all the sprinkler leaks that don't get fixed, and then the potential irrigation pipe leaks underground! LOTS of water wasted!
Simone - I agree and that's why I wrote it the way I did. It helps me, also, to know how a thing works before I call in someone to fix it for me.
Simone Haruko Smith from San Francisco on June 28, 2012:
This is so helpful! While I still have no intention of replacing an outdoor water faucet by myself, it really helps to know what to look for and which decisions I should be making.
Linda Chechar from Arizona on June 28, 2012:
Thanks for clearing up the tap, faucet and spigot confusion, watergeek. I've always used the terms interchangeably -- and incorrectly! Good instructions for this DIY project. I wonder how much water is wasted each year because of faulty outdoor plumbing? Not to mention the damaged caused to foundations and basements!
Susette Horspool (author) from Pasadena CA on June 27, 2012:
Aha! Plumbing is not your DIY field, eh? ;-)
Om Paramapoonya on June 27, 2012:
Thanks for the step-by-step instructions. You made it sound pretty simple, but still, it doesn't sound like fun. LOL Rated up and useful :)
Source: https://dengarden.com/home-improvement/How-to-Replace-an-Outdoor-Water-Faucet
0 Response to "Can I Lube Hose Spicket for Easy on Off"
Post a Comment